Monday, 10 February 2014

SQL Server : Capturing multiple IDENTITY values after inserting into SQL Server table


Usually we will have situation where we need to capture IDENTITY values after inserting into table, normally this can be achieved by using SCOPE_IDENTITY(), @@IDENTITY and IDENT_CURRENT() functions.
IDENT_CURRENT: returns the last identity value generated for a specific table in any session and any scope.
@@IDENTITY: returns the last identity value generated for any table in the current session, across all scopes.
SCOPE_IDENTITY : returns the last identity value generated for any table in the current session and the current scope.
The above functions are used to retrieve IDENTITY value for single record inserts.J

But, do you think these functions will satisfy all our requirements? My answer is NO, since they will not support for multiple inserts.

Nothing to worry, we have OUTPUT clause to capture the new IDENTITY values for a batch of inserted records which is explained below:

First, let us create sample table with few records.
CREATE TABLE [DBO].[Employee]
(

[EmployeeID] INT IDENTITY(1,1),
[EmployeeName] VARCHAR(100)
)
GO

INSERT INTO [DBO].[Employee] ([EmployeeName]) VALUES ('Vamsi Priya');
INSERT INTO [DBO].[Employee] ([EmployeeName]) VALUES ('Praveen');
INSERT INTO [DBO].[Employee] ([EmployeeName]) VALUES ('Sushma');
INSERT INTO [DBO].[Employee] ([EmployeeName]) VALUES ('Radhika');
INSERT INTO [DBO].[Employee] ([EmployeeName]) VALUES ('Harini');
INSERT INTO [DBO].[Employee] ([EmployeeName]) VALUES ('Chaitanya');

The same insertion can be done in SQL Server 2008 as below :

INSERT INTO [DBO].[Employee] ([EmployeeName])
VALUES
('Vamsi Priya'),('Praveen'),('Sushma'),('Radhika'),('Harini'),('Chaitanya')
GO

After inserting the records, let us execute and check what is the last [EmployeeID] using the below query.

SELECT @@IDENTITY
GO

The output would be 6. Still we are not satisfied with the result as we got only last inserted employee id, but not all the IDs which were inserted in the transaction.

This can be achieved using the below query :

Before this let us remove all the records from [Employee] table.

TRUNCATE TABLE [DBO].[Employee]
GO

As we know, TRUNCATE TABLE removes all rows from a table, but the table structure and columns remains. If the table contains an identity column, the counter for that column is reset to the seed value defined for the column.

DECLARE @EMPTABLE TABLE ([EmployeeID] INT,[EmployeeName] VARCHAR(100));

INSERT INTO [DBO].[Employee]
(
[EmployeeName]
)
OUTPUT INSERTED.[EmployeeID],INSERTED.[EmployeeName]
INTO @EMPTABLE ([EmployeeID],[EmployeeName])
SELECT 'Vamsi Priya' UNION ALL
SELECT 'Praveen'     UNION ALL
SELECT 'Sushma'      UNION ALL
SELECT 'Radhika'     UNION ALL
SELECT 'Harini'      UNION ALL
SELECT 'Chaitanya'
GO

Now, let us see the output :

SELECT [EmployeeID],[EmployeeName] FROM @EMPTABLE
GO


From the above example, you could understand how we can capture the multiple identity values. J

Note :
  1. I have used TABLE variable to capture the records, even TEMP TABLE also be used in place of TABLE variables.
  2. You can use this statement inside your stored procedure and also the result can be used for any other calculations within SP.
  3. This feature is available in SQL Server 2005 and above versions.

SQL Server : Keyboard Shortcuts for SQL Server Management Studio (SSMS)


When I was surfing the net yesterday, I found the SSMS query window keyboard shortcuts from www.simple-talk.com
I just felt the need to share with you how easily we can navigate the options in SSMS (SQL Server Management Studio) which also save our time.
Note :
You can also refer http://msdn.microsoft.com/en-us/library/ms174205.aspx

SQL Server : Find out Nth highest salary of employee using RANK() or DENSE_RANK() functions in SQL Server


This article is going to hash out some interesting question which is also one of the favorite questions asked in SQL Server interviews.  Hope, you guys got it. J
Yeap, you are right that is “Find out Nth  highest salary of employee”.
In the interviews, we used to get many answers for this questions like using CURSORS, Sub Query etc.,  which is involved lot of SQL statements with low performance.
This can be achieved very easily by using RANK()or DENSE_RANK()functions which were first introduced in SQL Server 2005.  It may be old function but it’s worth of sharing. J
Let us create sample table with few records for this demo.
CREATE TABLE [DBO].[Employee]
(
      [EmpCode]   INT   IDENTITY    (1,1),
      [EmpName]   VARCHAR(100)      NOT NULL,
      [Salary]    NUMERIC(10,2)     NOT NULL,
      [DeptName]  VARCHAR(100)      NOT NULL
)
GO

INSERT INTO [DBO].[Employee] ([EmpName],[Salary],[DeptName]) VALUES ('Priya',60000,'IT');
INSERT INTO [DBO].[Employee] ([EmpName],[Salary],[DeptName]) VALUES ('Chaitu',55000,'IT');
INSERT INTO [DBO].[Employee] ([EmpName],[Salary],[DeptName]) VALUES ('Praveen',35000,'IT');
INSERT INTO [DBO].[Employee] ([EmpName],[Salary],[DeptName]) VALUES ('Sathish',57000,'IT');
INSERT INTO [DBO].[Employee] ([EmpName],[Salary],[DeptName]) VALUES ('Ramana',62000,'IT');
INSERT INTO [DBO].[Employee] ([EmpName],[Salary],[DeptName]) VALUES ('Kiran',75000,'IT');
INSERT INTO [DBO].[Employee] ([EmpName],[Salary],[DeptName]) VALUES ('Krishna',78534,'IT');
INSERT INTO [DBO].[Employee] ([EmpName],[Salary],[DeptName]) VALUES ('Sravani',23000,'IT');
INSERT INTO [DBO].[Employee] ([EmpName],[Salary],[DeptName]) VALUES ('Mahesh',23500,'IT');
INSERT INTO [DBO].[Employee] ([EmpName],[Salary],[DeptName]) VALUES ('Raman',45000,'Accounts');
INSERT INTO [DBO].[Employee] ([EmpName],[Salary],[DeptName]) VALUES ('Raghu',35250,'Accounts');
INSERT INTO [DBO].[Employee] ([EmpName],[Salary],[DeptName]) VALUES ('Noha',27000,'Sales');
INSERT INTO [DBO].[Employee] ([EmpName],[Salary],[DeptName]) VALUES ('Sushma',29500,'Sales');
INSERT INTO [DBO].[Employee] ([EmpName],[Salary],[DeptName]) VALUES ('Sekhar',30000,'Sales');
INSERT INTO [DBO].[Employee] ([EmpName],[Salary],[DeptName]) VALUES ('Ravi',30000,'Sales');
INSERT INTO [DBO].[Employee] ([EmpName],[Salary],[DeptName]) VALUES ('Harini',35000,'Sales');
Hope, successfully the above statements were executed and the records are inserted into [Employee]table.
Let us execute the below query to check the inserted records:
SELECT
      [EmpCode],[EmpName],[Salary]
FROM
      [DBO].[Employee] WITH (NOLOCK)
GO

The output would be as shown below :
Now, the question is to display 4th highest salary of employee. Before that let us execute and find manually what is the 4th highest salary in the table using the following query. 
SELECT
      [EmpCode],[EmpName],[Salary]
FROM
      [DBO].[Employee] WITH (NOLOCK)
ORDER BY
      [Salary] DESC
GO

The output would be as shown below :
Now, let us find out the 4th highest salary of employee using RANK()function:
As we have seen from the above output, the fourth highest salary is “60000” of employee “Priya”, let us execute the below SQL statement and confirm whether it  gives the same output.

SELECT
      [EmpCode],[EmpName],[Salary]
FROM(     SELECT
      [EmpCode],[EmpName],[Salary]
    ,RANK() OVER (ORDER BY [Salary] DESC) AS [Highest]
FROM
      [DBO].[Employee] WITH (NOLOCK)
) AS High
WHERE
      [Highest] = 4
GO

Yeap, this is what we expected right. J

Let me add few more records for other scenarios where we may not use RANK()function, for this example let us insert few more records.
INSERT INTO [DBO].[Employee] ([EmpName],[Salary],[DeptName]) VALUES ('Yash',60000,'IT');
INSERT INTO [DBO].[Employee] ([EmpName],[Salary],[DeptName]) VALUES ('Bhaskar',60000,'Accounts');
INSERT INTO [DBO].[Employee] ([EmpName],[Salary],[DeptName]) VALUES ('Swetha',75000,'IT');
INSERT INTO [DBO].[Employee] ([EmpName],[Salary],[DeptName]) VALUES ('Shailaja',45000,'Sales');
Just execute the below query to check the inserted records:

SELECT
      [EmpCode],[EmpName],[Salary]
FROM
      [DBO].[Employee] WITH (NOLOCK)
GO
Now, again the question is to display 4th highest salary of employee. Before that let us execute and find manually what is the 4th highest salary in the table using the following query.

As we know the 4th highest salary is “60000”and there are three employees having the same salary. Let us execute the above query and check the result now.

SELECT
      [EmpCode],[EmpName],[Salary]
FROM(     SELECT
      [EmpCode],[EmpName],[Salary]
    ,RANK() OVER (ORDER BY [Salary] DESC) AS [Highest]
FROM
      [DBO].[Employee] WITH (NOLOCK)
) AS High
WHERE
      [Highest] = 4
GO

The output would not be as we expected. L
Let us execute the same query with including [Highest] column in the SELECT statement.
SELECT
      [EmpCode],[EmpName],[Salary],[Highest]
FROM
(    
SELECT
      [EmpCode],[EmpName],[Salary]
    ,RANK() OVER (ORDER BY [Salary] DESC) AS [Highest]
FROM
      [DBO].[Employee] WITH (NOLOCK)
) AS High
GO
From the above query output, we can understand that “60000” salary is went to 5th position, It’s because If two or more rows tie for a rank, each tied rows receives the same rank.
Also, you can see, it’s skipped the 3rd position because there are 2 guys in 2nd position.
I know what you are thinking, you do not want to skip any position even in tied situation. Am I right?  J
Yeap, For this kind of situation we can go for DENSE_RANK()function.
Let us execute the same query with replacing DENSE_RANK() function instead of  RANK().
SELECT
      [EmpCode],[EmpName],[Salary],[Highest]
FROM
(    
SELECT
      [EmpCode],[EmpName],[Salary]
    , DENSE_RANK() OVER (ORDER BY [Salary] DESC) AS [Highest]
FROM
      [DBO].[Employee] WITH (NOLOCK)
) AS High
GO
From the above query output, you can understand even the values are tied, it is giving rank without any gaps.
Now, let us execute the below statement to find again the 4th highest though we know it is  “60000”.  
SELECT
      [EmpCode],[EmpName],[Salary]
FROM

(     SELECT
      [EmpCode],[EmpName],[Salary]
    , DENSE_RANK() OVER (ORDER BY [Salary] DESC) AS [Highest]
FROM
      [DBO].[Employee] WITH (NOLOCK)
) AS High
WHERE
      [Highest] = 4
GO
Yeap, we got the same result as we expected. J
The same query can be modified slightly , so that we can identify the Nth  highest salary of employee.
The below query will give us the 2nd highest salary of employee. If you want, you can change the value and execute. J
DECLARE @iHightest      INT
SET @iHightest = 2
SELECT
      [EmpCode],[EmpName],[Salary]
FROM
(    
SELECT
      [EmpCode],[EmpName],[Salary]
    , DENSE_RANK() OVER (ORDER BY [Salary] DESC) AS [Highest]
FROM
      [DBO].[Employee] WITH (NOLOCK)
) AS High
WHERE
      [Highest] = @iHightest
GO
The output would be :
Sometime, we may need to find out  Nth  highest salary of each department. Here, we go. J
DECLARE @iHightest      INT
SET @iHightest = 2
SELECT
      [EmpCode],[EmpName],[Salary],[DeptName]
FROM
(    
SELECT
      [EmpCode],[EmpName],[Salary],[DeptName]
    , DENSE_RANK() OVER (PARTITION BY [DeptName] ORDER BY [Salary] DESC) AS [Highest]
FROM
      [DBO].[Employee] WITH (NOLOCK)
) AS High
WHERE
      [Highest] = @iHightest
ORDER BY
[DeptName]
GO
The output would be :
From the above result, we could get the 2nd highest salary for each department. Have you noticed that in the SQL statement I have used PARTITION BY clause
Which divides the result set produced by the FROM clause into partitions to which the DENSE_RANK()function is applied. 
Hope, you have enjoyed reading this article and share your comments. J
Note :
  1. RANK()or DENSE_RANK()will work in SQL Server 2005 and above versions.
  2. For more info refer http://msdn.microsoft.com/en-us/library/ms173825

SQL Server : Step by step installation guide for SQL Server 2012 (Denali)


I have so exciting news! Microsoft has released SQL Server 2012 RTM (Code name “Denali”) on March 6 for manufacturing and download the evaluation edition from http://www.microsoft.com/download/en/details.aspx?id=29066

As my laptop is 32-bit system, so I have downloaded the following files from the above link. Likewise, you can download the files for 64-bit system(x64) too. :) Finally, check your system requirements from the same link.

ENU\x86\SQLFULL_x86_ENU_Core.box
ENU\x86\SQLFULL_x86_ENU_Install.exe
ENU\x86\SQLFULL_x86_ENU_Lang.box

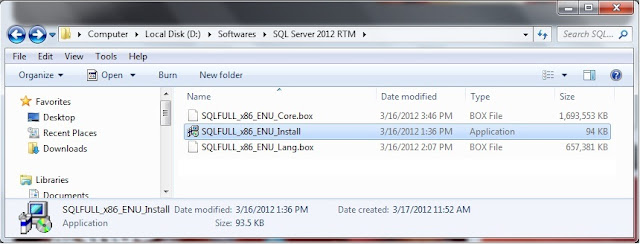
After downloading the above files, your system will look like below:


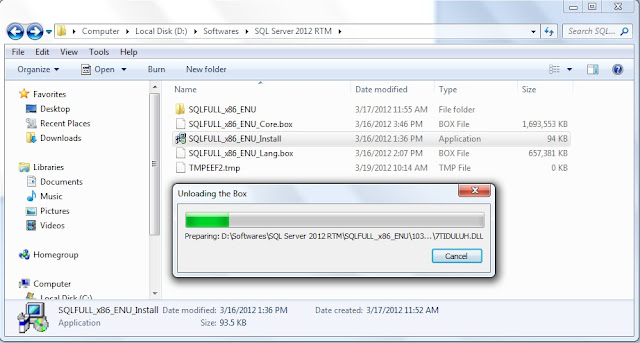
Double click the “SQLFULL_x86_ENU_Install.exe”, it will extract the required files for installation in the “SQLFULL_x86_ENU” folder as shown below:


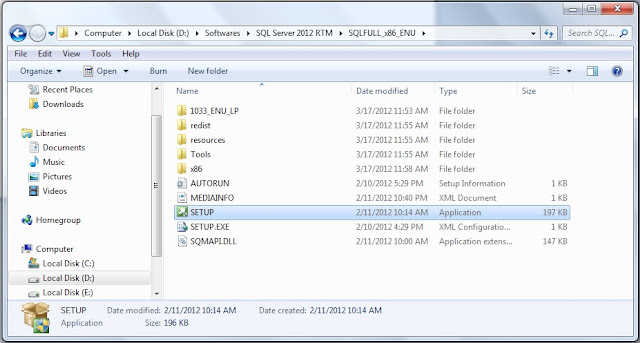
Click the “SQLFULL_x86_ENU” folder and double click “SETUP” application.


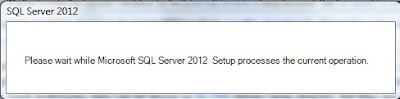
Checking your system requirements for installation.


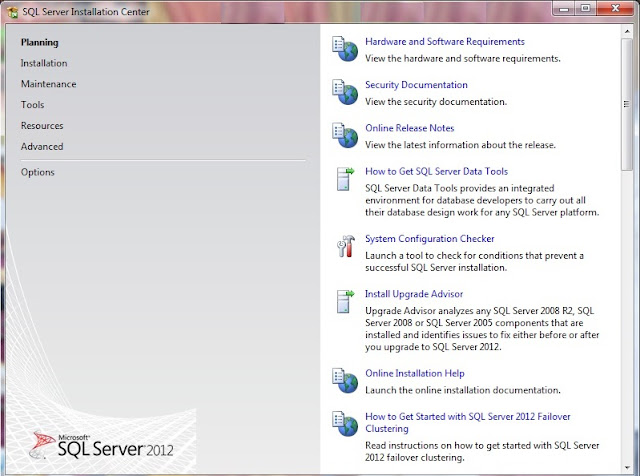
When you see “SQL Server Installation Center” screen, it means that your system configuration is perfect for “Denali” installation. :)


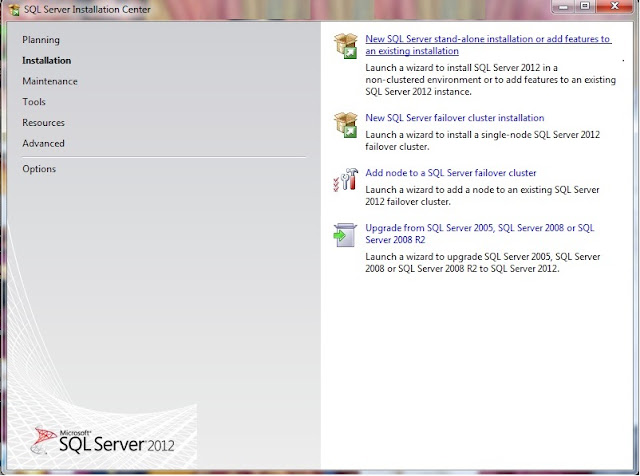
Click installation from the left pane and select “New SQL Server stand-alone installation or add features to an existing installation”.


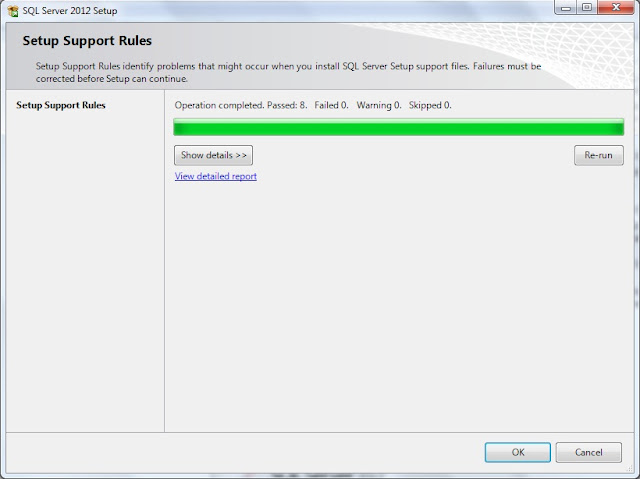
In the “Setup Support Rules” Click "OK" button when you have failed 0. Otherwise fix the issue and click "Re-run" button.


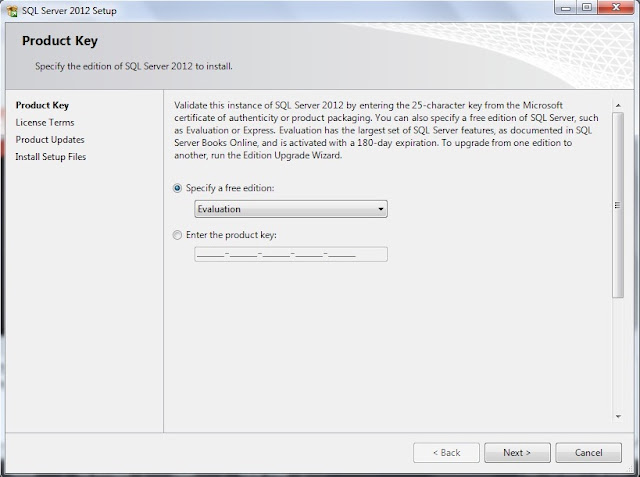
Here, I left default edition “Evaluation”, but you can also choose “Express” edition from the drop down list. (Leave the product key as of now, later you can convert to licensed version at any time, refer the above link.


Press “Next” button.


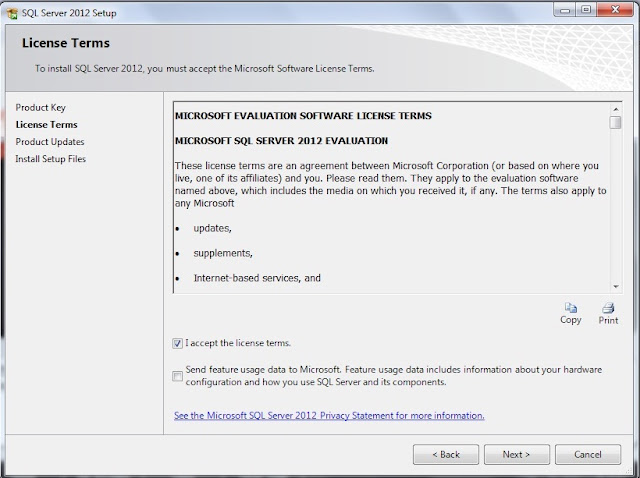
Select the “I accept the license terms” and click “Next” button.


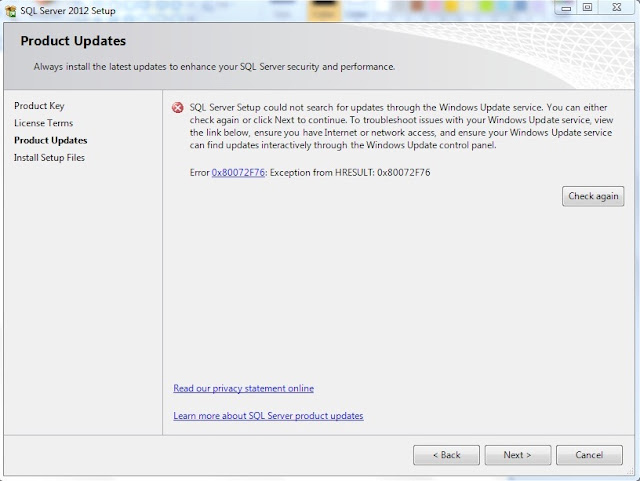
I have installed in “Offline” mode, So I got the above error message otherwise, it does windows update automatically and will continue the process. :)
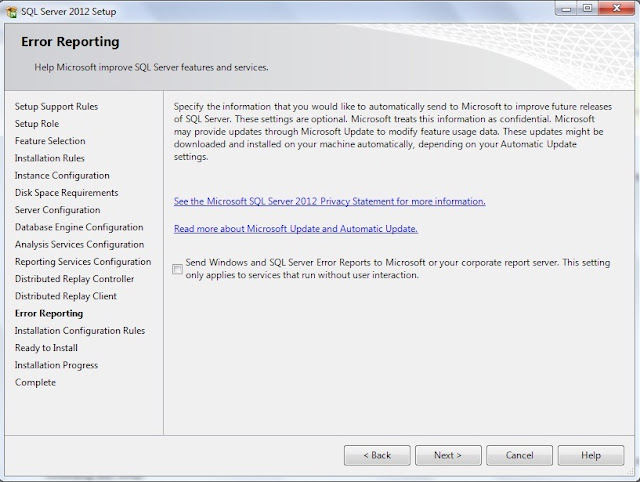
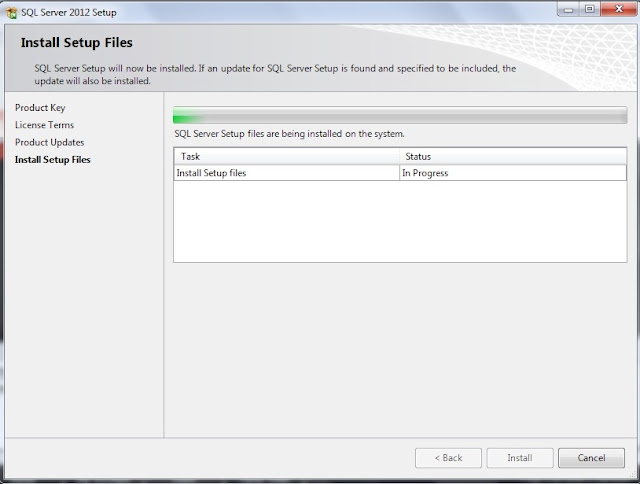
Press “Next” button.


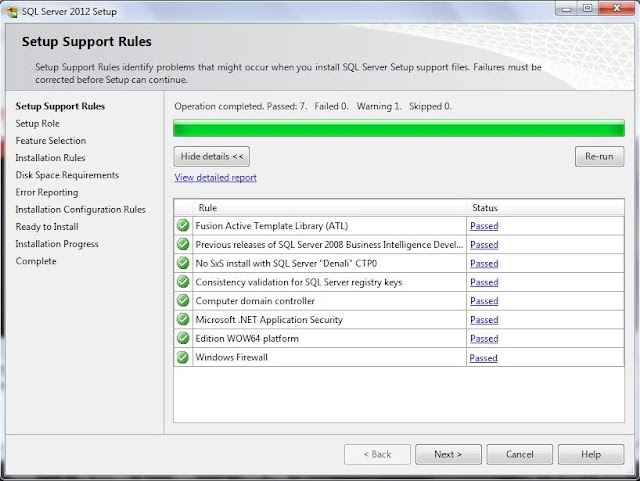
Press “Next” button, if all status are passed. Otherwise fix the issue and press “Next” button.


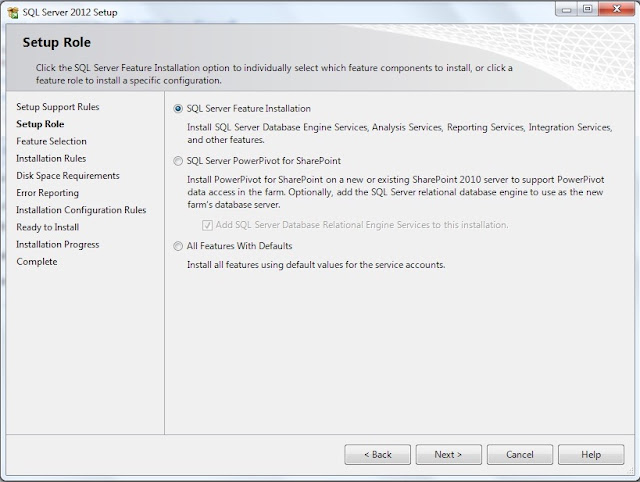
I left the default feature “SQL Server Feature Installation”, if you do not want to change the option then  press “Next” button.


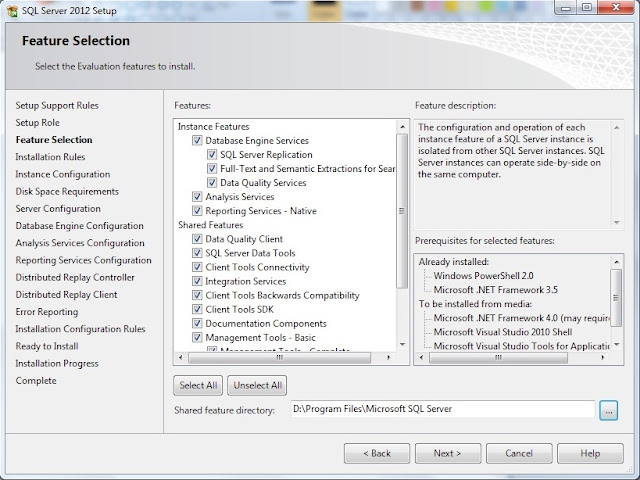
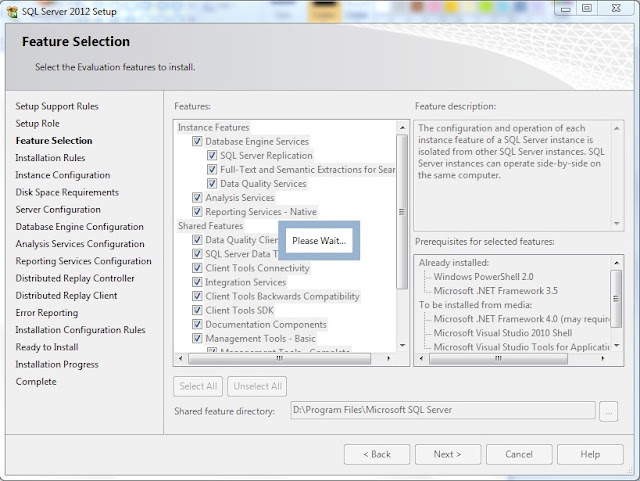
Select the features and change the “Shared feature directory” if you want, otherwise press “Next” button.


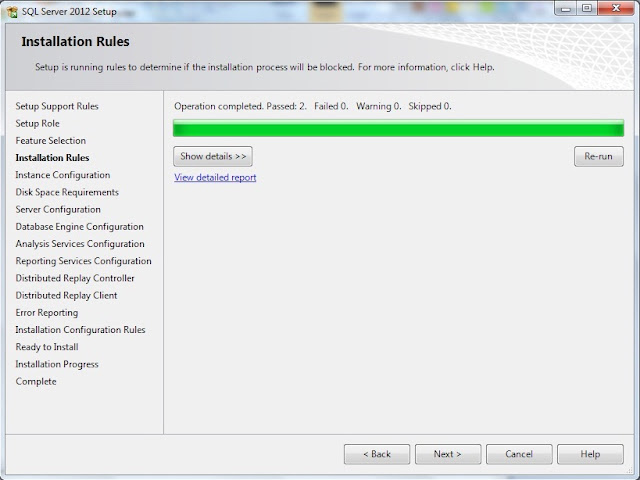
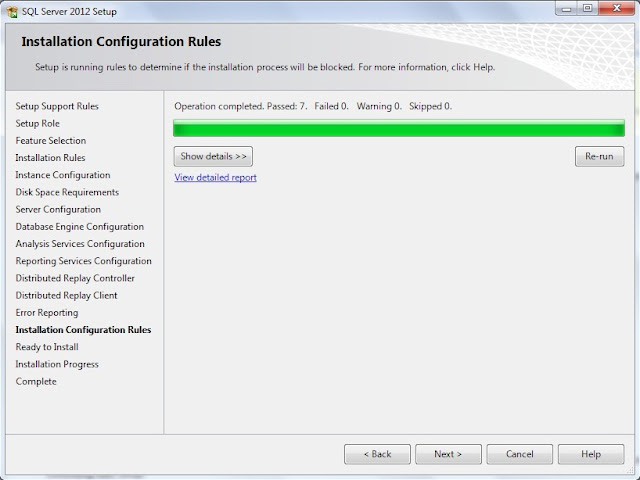
Press “Next” button if failed count is 0.


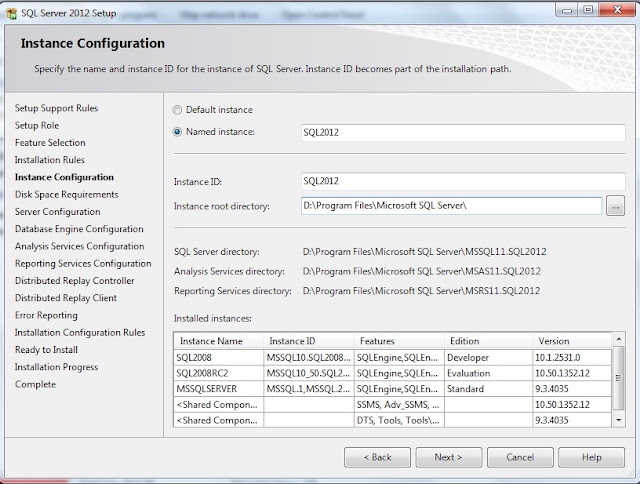
As I have already 2 instances, so I have selected “Named Instance” and given the instance (server) name.  You can change “Instance root directory” if you want. Otherwise, press “Next” button.


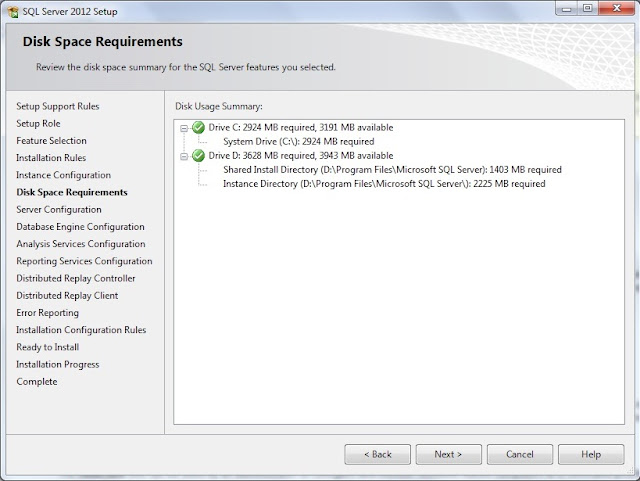
It will not allow, if you do not have sufficient space in the disc. Press “Next” button.


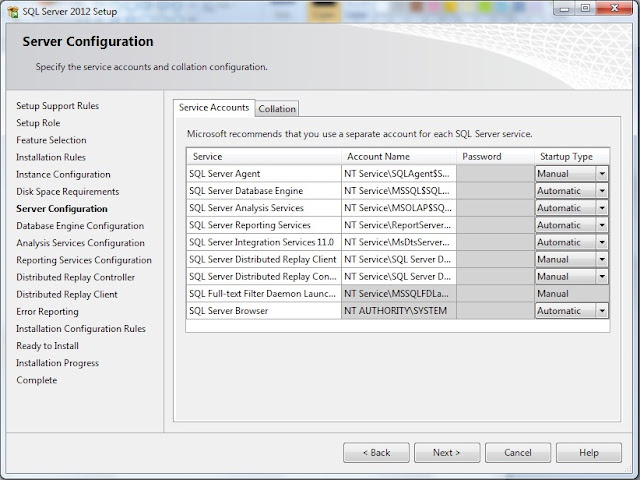
You can change the “Startup Type” for SQL services in the tab. Which also can be done in the Control Panel “Services” after installation.


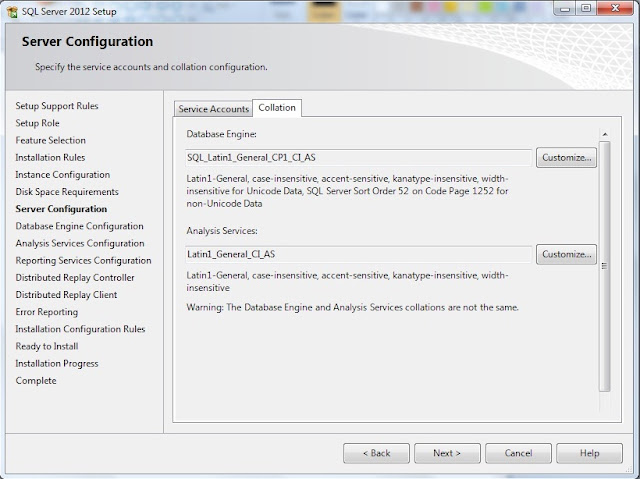
Change the “Collation” if you want, otherwise Press “Next” button.


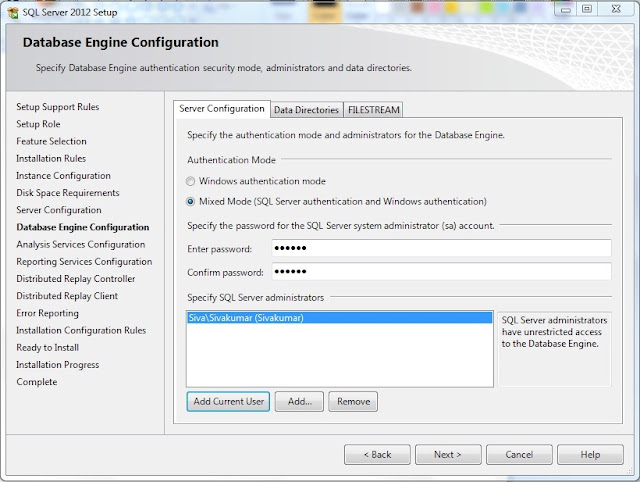
Choose the authentication mode and specify the “Administrator” user. Here, I have selected “Add Current User”. Also, you can change the “Data Directories” and enable “FILESTREAM” if you want , otherwise Press “Next” button.


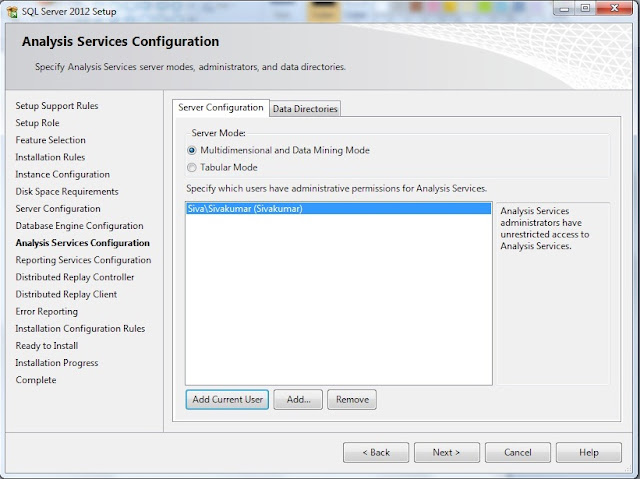
You can change the Analysis Services “Server Mode” and “Administrator” user. Here, I have selected “Add Current User”. Also change the “Data Directories” if you want , otherwise Press “Next” button.

Note : You can select only one server mode to use: “Multidimensional and Data Mining Mode” or “Tabular Mode”. If you want both, you need to run the setup again after the first instance setup. Refer Books online.


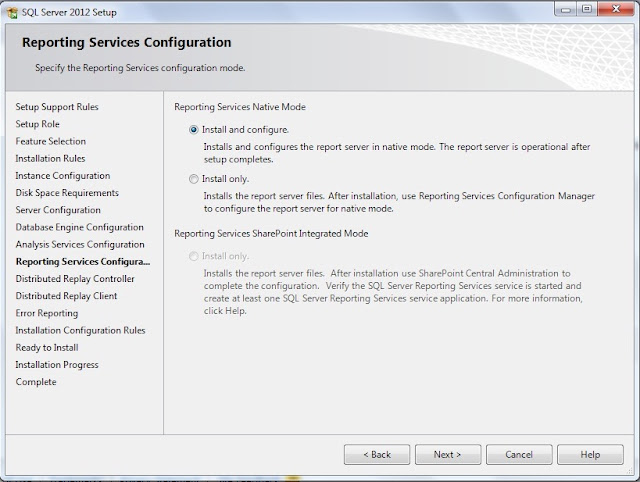
Here, you need to choose “Reporting Services Native Mode” and press “Next” button.


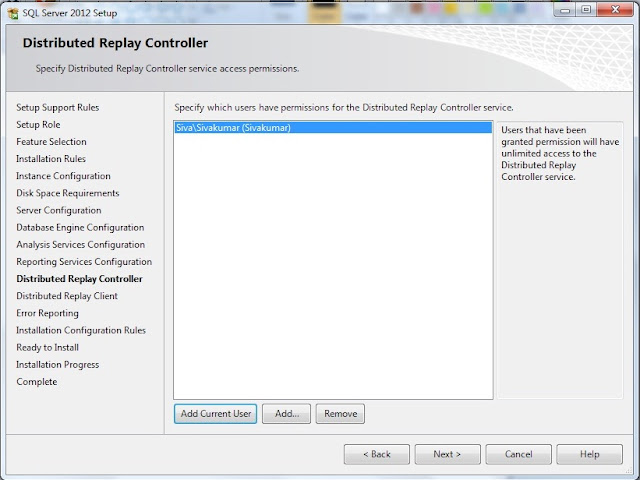
“Distributed Replay Controller” service feature is new in SQL Server 2012, here specify the user who should have permission to use this service. Press “Next” button.

Note : Distributed Replay feature helps you assess the impact of future SQL Server upgrades.
Refer http://msdn.microsoft.com/en-us/library/ff878183(v=sql.110).aspx


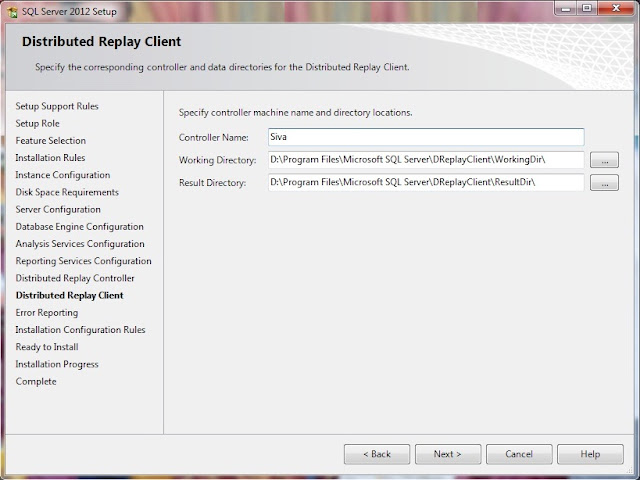
Specify the Controller Machine name which should have “Distributed Replay Controller” service. Also you can change the working directory and Press “Next” button.


Press “Next” button, if failed count is 0.


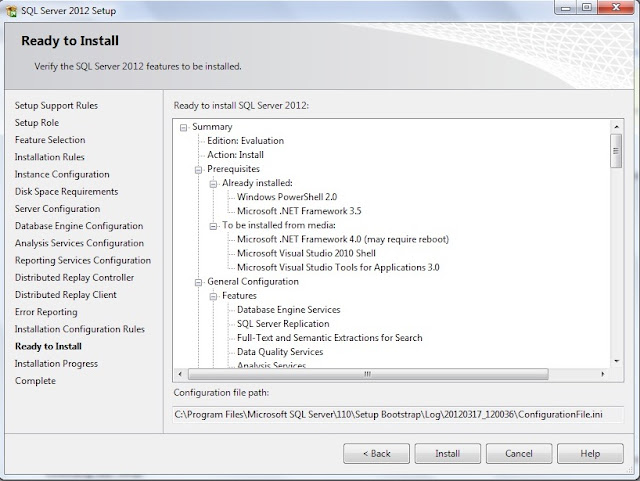
Here, you can find the list of "SQL Server 2012" features which will be installed. If you would have missed to enable any features, click “Back” button and enable. Otherwise press “Install” button to proceed.


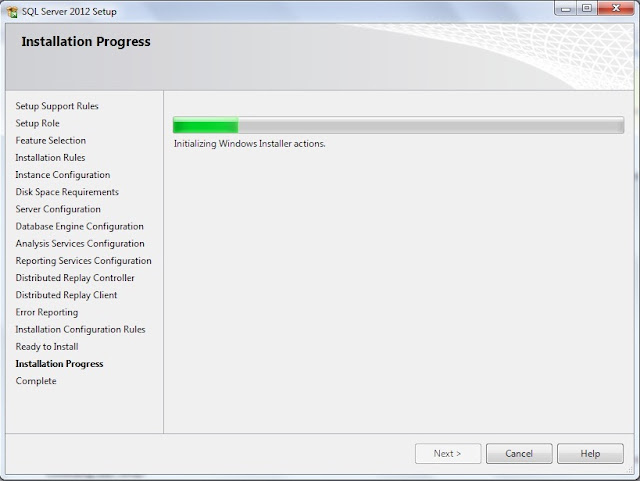
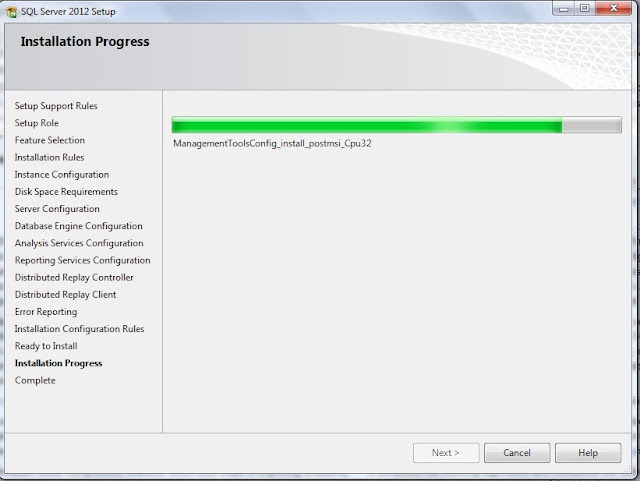
You can see installation progress. Press “Cancel” button, if you want to stop the installation.


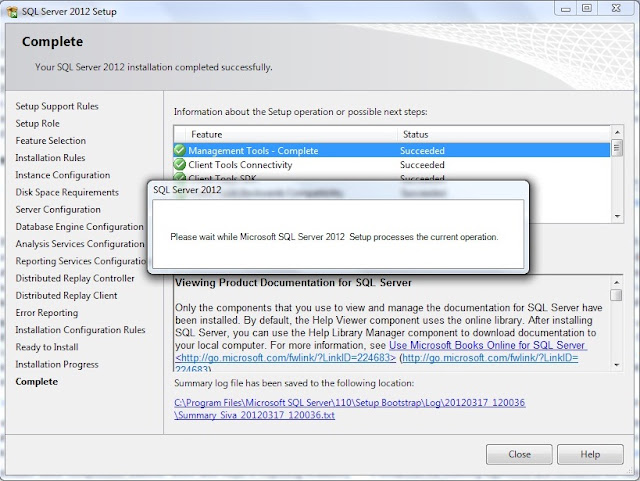
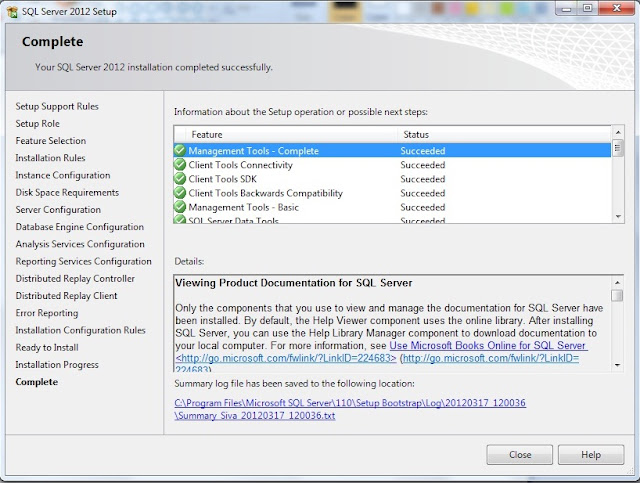
After the successful installation, your screen should look like below :


Wow, you have successfully installed SQL Server 2012 and to confirm the successful of installation from the screen, you can find the “Succeeded” for all the features and refer summary log file for further info.
Press “Close” button.

Now, you can play with SQL Server 2012 features.
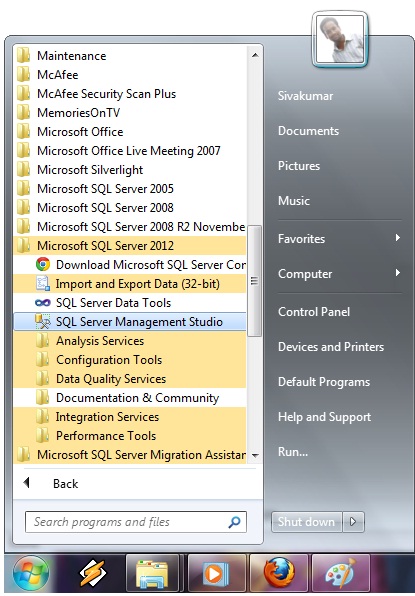
Go to “SQL Server 2012” menu and click “SSMS”.


Select appropriate SQL Server 2012 instance and authentication mode and click “Connect” button.


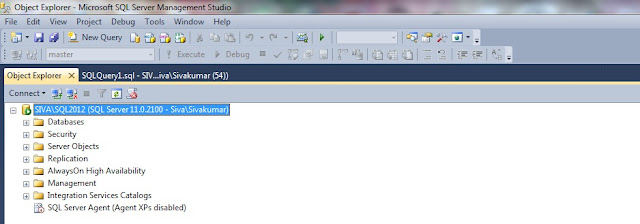
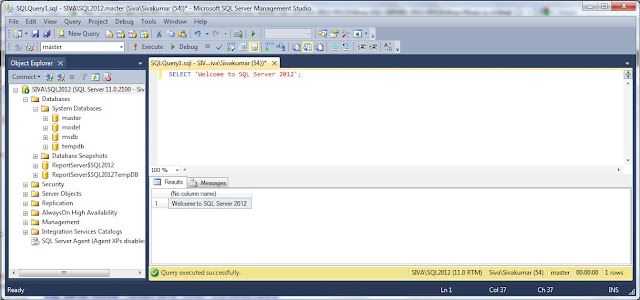
Now, you are in SQL Server 2012 management studio. :)


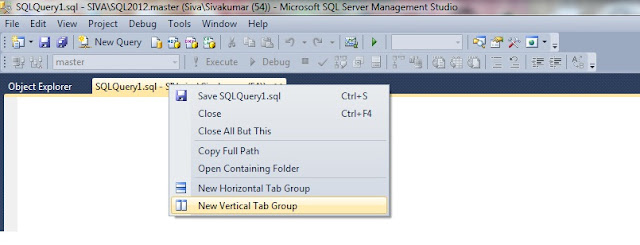
Now, you can right click and change the “New Vertical Tab Group”.


Write your favorite query and execute. All the very best for your learning :)